If you’re a complete beginner, with the intention of setting up a testnet STX miner for the first time using a Windows PC, you’re at the right place. Follow these easy step-by-step walkthroughs to get your STX miner set up and running!
Before you begin, check that you have the necessary software installed on your PC:
Rust, Microsoft C++ Build Tools 2019(C++ build tools), Git , node.js, curl and Python
Tutorials that I’ve relied upon while writing this walkthrough
- Blockstack – Running a Testnet node – direct link
- Blockstack – Mine Stacks Token – direct link
Once you have all software installed, power up your command prompt and insert your first command:
git clone https://github.com/blockstack/stacks-blockchain.git
#This is to download stacks blockchain files on to your computer
Subsequently once installation is done, proceed with the second part of the command:
cd stacks-blockchain
#This is to set the pathway pointing towards stacks-blockchain folder on your PC
Next, copy the following to your command prompt:
cargo build --workspace --release --bin stacks-node
It’ll take a couple of minutes for the program to run.. Once its done, proceed with the next command:
You will have to ensure that the pathway is pointing towards “stacks-blockchain/target/release”. Thus from your current pathway C:\Users\User\stacks-blockchain> type: cd /target/release
#Note the second User(highlighted in blue) above will be your PC name, for me I’ve named it User.
Once the pathway is set, type:
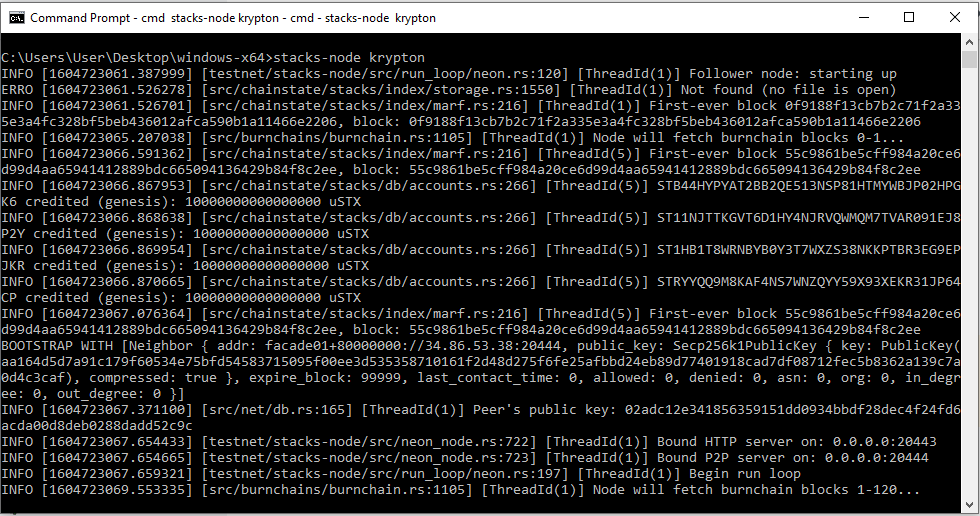
stacks-node krypton
#This is to run the stacks node, Krypton is the current testnet phase, once mainnet a different name will be used
If you’re prompted with an error message that says panic thread
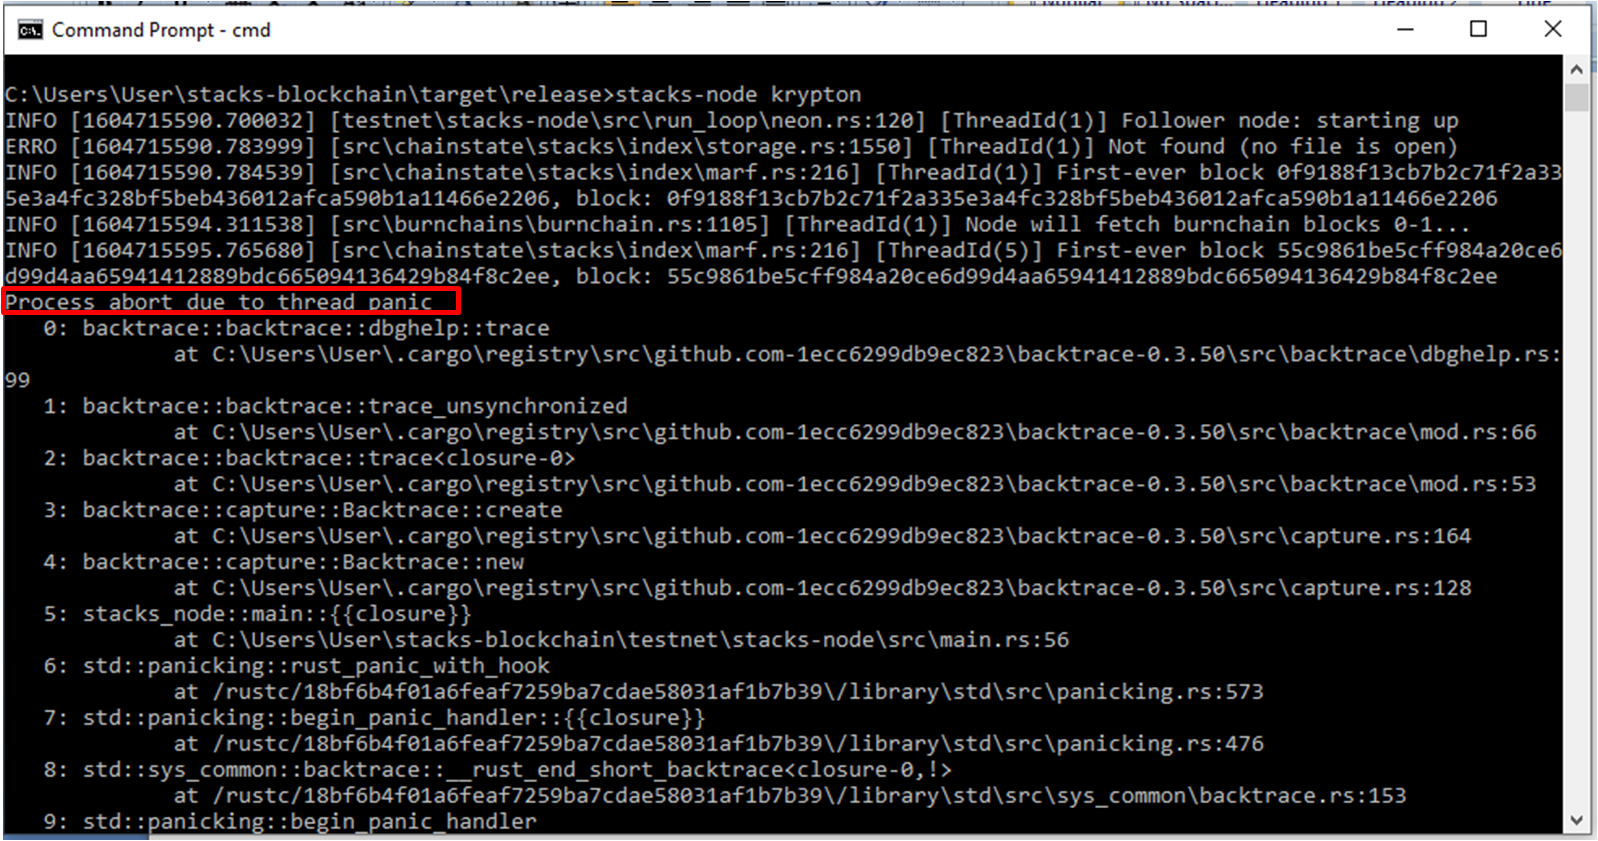
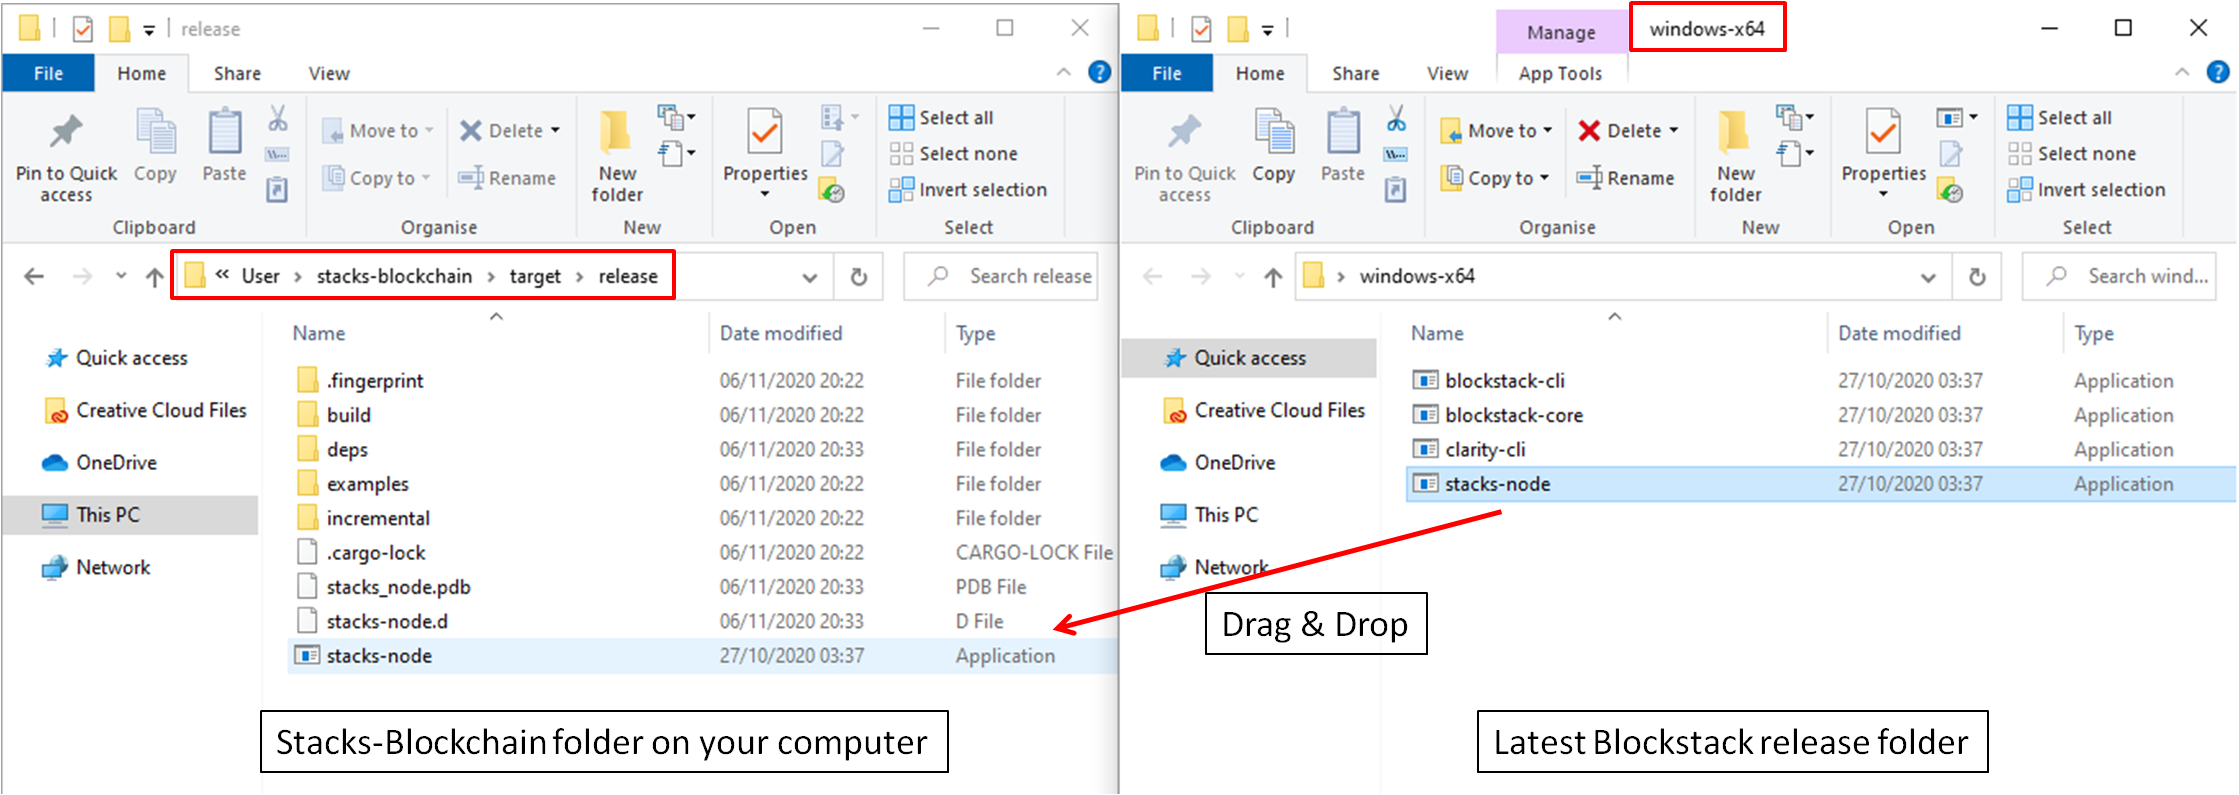
Then it could be due to your stacks node executable file is not the latest. Download the latest Blockstack release(windows-x64.zip) – direct link and overwrite the stacks-node on your PC with the latest file.
You will know that your node is running successfully if you see your log look something like this:
(INFO [1588108047.585] [src/chainstate/stacks/index/marf.rs:732] First-ever block 0f9188f13cb7b2c71f2a335e3a4fc328bf5beb436012afca590b1a11466e2206)
Now you have your node up and running! Next it’ll be to set up STX miner.
Press Crt + C in the command prompt to stop the above node from running.
Install @stacks/cli with the following command:
npm install --global @stacks/cli
Subsequently type the following to generate your keychain:
stx make_keychain -t > cli_keychain.json
After your keychain is generated, remember to keep the information as you will need it later.

Use the following command to get testnet BTC to your address:
curl -XPOST https://stacks-node-api.blockstack.org/extended/v1/faucets/btc?address=
<btc_address>
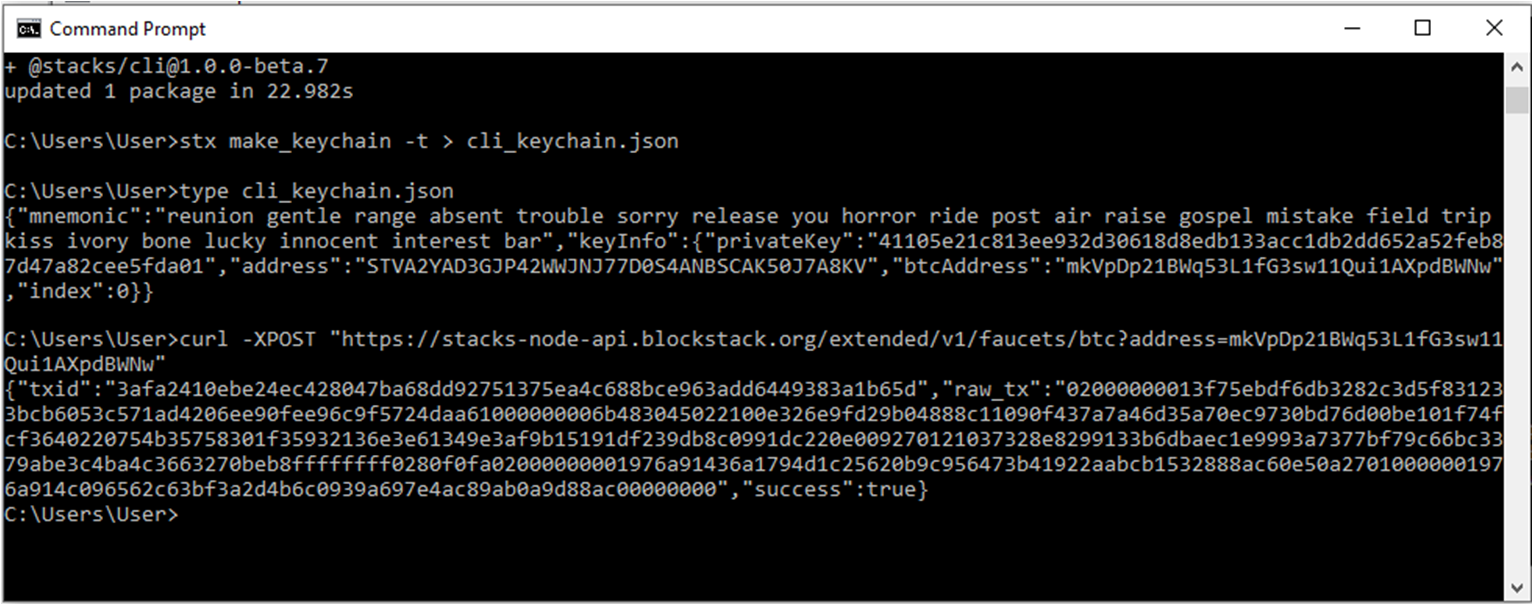
Replace the <btc_address> with the chain of letters generated from your keychain “btcAddress”
#Please note that only during testnet phase that you insert testnet btcAddress and seedphrase, in the case of mainnet, please insert a btcAddress that you own, along with its private key.
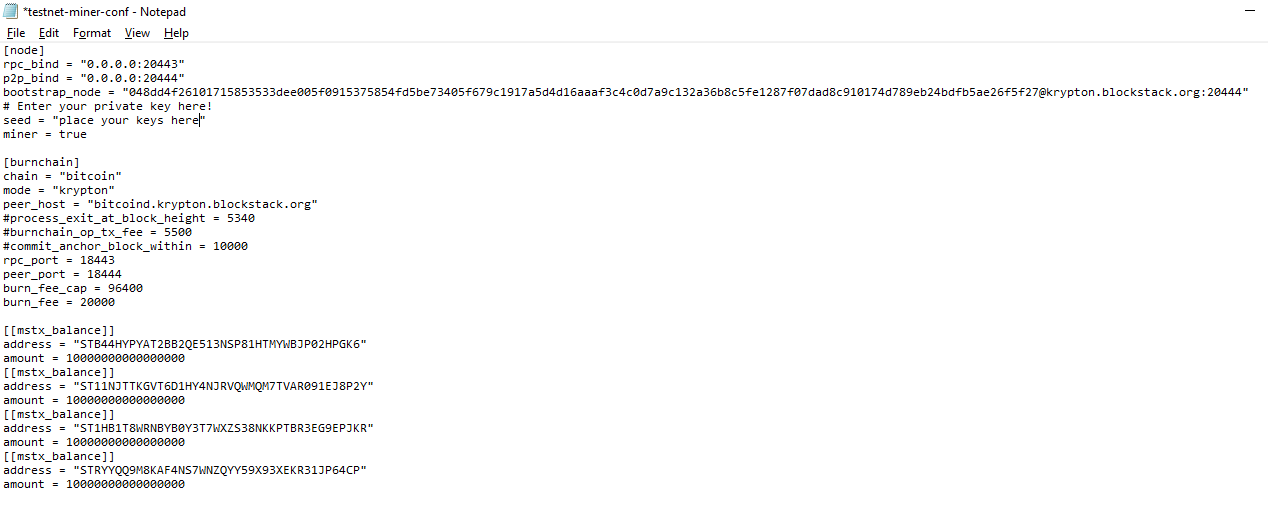
Thereafter, create a file using notepad with the following chain of commands:
[node]
rpc_bind = "0.0.0.0:20443"
p2p_bind = "0.0.0.0:20444"
bootstrap_node = "048dd4f26101715853533dee005f0915375854fd5be73405f679c1917a5d4d16aaaf3c4c0d7a9c132a36b8c5fe1287f07dad8c910174d789eb24bdfb5ae26f5f27@krypton.blockstack.org:20444"
# Enter your private key here!
seed = "replace-with-your-private-key"
miner = true

[burnchain]
chain = "bitcoin"
mode = "krypton"
peer_host = "bitcoind.blockstack.org"
#process_exit_at_block_height = 5340
#burnchain_op_tx_fee = 5500
#commit_anchor_block_within = 10000
rpc_port = 18443
peer_port = 18444

[[mstx_balance]]
address = "STB44HYPYAT2BB2QE513NSP81HTMYWBJP02HPGK6"
amount = 10000000000000000
[[mstx_balance]]
address = "ST11NJTTKGVT6D1HY4NJRVQWMQM7TVAR091EJ8P2Y"
amount = 10000000000000000
[[mstx_balance]]
address = "ST1HB1T8WRNBYB0Y3T7WXZS38NKKPTBR3EG9EPJKR"
amount = 10000000000000000
[[mstx_balance]]
address = "STRYYQQ9M8KAF4NS7WNZQYY59X93XEKR31JP64CP"
amount = 10000000000000000
* Replace the seed field with your private key. Save and close the configuration file and naming it: testnet-miner-conf.toml
Subsequently, head over to your stacks-blockchain folder. Generally this folder can be found in: “C:\Users\User\stacks-blockchain\testnet\stacks-node\conf” and place your newly created file in the location.
Lastly, ensure that your pathway is C:\Users\User\stacks-blockchain\target\release> and proceed with the final command:
stacks-node start --config=../../testnet/stacks-node/conf/testnet-miner-conf.toml
Viola! Your miner node should be up and running.

I set out to start my own stx miner with zero programming knowledge, while the learning curve was somewhat steep initially, it was with great help from the community(Special thanks to @whoabuddy & @Harini Rajan Ӿ), along with Blockstack tutorials that I’m able to get my miner up and running. Hope this guide will be useful to you! Head over and be part of the mining chat group.
Read on Part 2 to find out more about: The economics behind STX mining